Thanksgiving Eve Pie Night

thanksgiving pies

From top right clockwise: Derby Pie, Pumpkin Pie, Topless Apple Pie, Beehive Pie

On Thanksgiving eve I decided to bake some pies. There was the traditional pumpkin pies (2), a derby pie (ok, not so traditional) and apple pies (2). I had been looking through Pinterest (all research mind you!) and other blogs/websites/cookbooks and came across some variations for apple pies that I wanted to try.

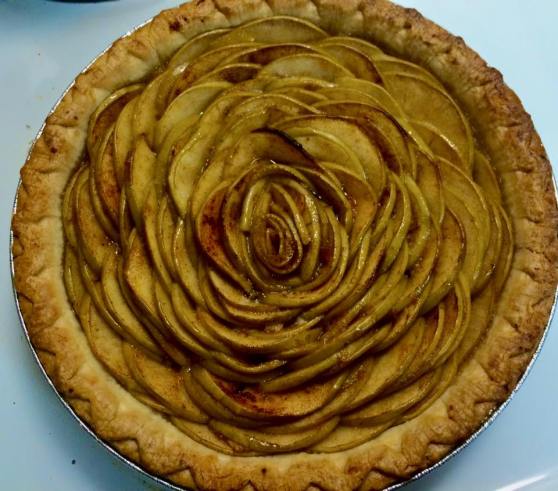
The first was a rose design. This can be made with apple slices rolled together to make one bloom and then combined with 15-20 or more to fill a pie shell. It can also resemble one large bloom, with all the slices arranged in the pie shell to form a rose design.

The recipe that served as the foundation for my pies can be found here. I made some changes, adding light brown sugar, omitting granulated sugar, adding apple pie spice, omitting nutmeg (and after preparing the topless apple pie I added 1/4 cup of apple bourbon to the remaining apples for the second pie.

I decided to go with the large rose design. It didn’t take all that long even though it looks like it might have taken forever. The apples were cut in half, then cored, then sliced in 1/8″ slices. This was great practice for my knife skills. It is important to have your slices this thin (and be consistent) so they macerate well and become flexible enough to bend without breaking.

After macerating the apples, layering them together, baking, and glazing with an apricot cinnamon sauce, the end result was out of this world! And the taste as well!

apples mascerating

Apples macerating in sugars, lemon juice and seasonings

I also left the skins on my apples. The green from the Granny Smith apples looked nice but faded when baked. I will try this again with red apples and compare the two.

topless apple prebake

Before baking

topless apple pie

After baking

For the glaze, I took about 4 or 5 tablespoons of apricot preserves and heated it in a sauce pan with the juices from the apples. I reduced it to make a nice glaze. I didn’t fool with straining it as the recipe called for, I just used my brush and made sure there were no apricot pieces/clumps on it when I glazed the pie.

topless slice 1

A slice of the “Topless Apple Pie”

The second apple pie used a top crust with holes in it. I found this somewhere (probably Pinterest or FB) called a beehive (or honeycomb) crust. You take an apple corer (or any tool that will cut out circles) and cut out circles in the crust. It made a very nice design and the pie tasted great as well (I also added some Jim Beam Apple Bourbon to the apples as they macerated!).

beehive apple prebake

Before baking

beehive apple baked

After baking

I brushed an egg/milk wash over the crust and sprinkled it with some demerara sugar crystals on it to give it that nice crust. This pie used the apples with the apple bourbon in it.

Both pies tasted very good. I posted pictures of these on several social media sites and some didn’t like them, some were confused, and some loved them. One Facebook group I am in garnered over 3.1K likes! I was blown away. Well, I still am. It is very encouraging and very humbling.

I love baking/cooking and look forward to many more unique dishes being created. If these aren’t for you, then make them traditional. Just make sure you bake from the heart! That’s the most important piece of advise I could give you. The style, that’s not as important. The heart, that’s critical in my philosophy of baking!

Enjoy!

Cast Iron Skillet Cooking

A month or so ago I purchased my first cast iron skillet. Growing up we had one at home and I can remember my mom using it often. Now that I am going all in with the culinary life I knew it was time to purchase one of my own and begin using it.

My purchase was a 12″ Lodge preseasoned skillet and the menu was a pan seared pork chop, oven roasted brussel sprouts with bacon, sweet potato baby carrot mash, apple chutney and cast iron smoked cheddar and collard green cornbread.

For dessert I made an apple bourbon bread pudding. The apples were initially fried in the cast iron skillet before adding the bread cubes for the dessert.

The dinner turned out amazing and there is nothing like cooking in a cast iron skillet. Below are the pics of the meal that was prepared.

Recap (ok, more like a relaunch!)

To any of my readers, let me first apologize for not posting. Much has been happening and life changes continue to unfold. Long story short, “CakeRageous: Cupcakes and Confections” still doesn’t have a “home-base” but baking continues; culinary school is going extremely well (I was on a 3-person team that won a cooking competition and also had the opportunity to work with Chef Aaron Sanchez from Chopped), and I continue to experiment with many different recipes and types of food.

To expedite posting and make up for lost time, I am going to add several posts grouped by the food that was prepared without any recipes. If there is something that catches your eye or you have any questions/comments, just message me and we will go from there.

Hopefully, maybe with some prompting from readers, I will work on having at least one post a week, more if possible!

Thank you for your understanding and patience! Here’s something I am thinking about preparing for Christmas!

dacquoise

This is something I would really like to try!


It’s time for an upgrade

I grew up eating Ramen noodles. Not because I chose too, but because they are economical. Growing up in a family of siblings and step siblings (there were times our house had 10 in it!) they became a staple. Then as a broke college student they became a necessity!

Over time I began using less and less water for the broth. As the years passed, I moved away from eating Ramen as often. However, those prepackaged tasteless noodles have recently been reintroduced in my life. So, rather than making them according to the package directions or with less water in the broth, I’ve upgraded them significantly.

noodles

After microwaving the noodles I ditch the seasoning packet completely for my own concoction. In the picture above I added the following ingredients:

Chinese Five Spice

Pepper

Garlic

Sunny side up egg

Spinach

Sriracha

Soy sauce

Salt, just a pinch

There are so many variations to upgrade these simple noodles! Multiple websites have countless combinations of spices and ingredients to enhance and upgrade these cheap $0.17 a package noodles. You can check out two of them here and here.

Be creative! Several years ago I had the opportunity to go to China on a mission trip. It is amazing what one can create with noodles. I had some of the best noodles/soup ever. And the ingredients were all over the place, from quail eggs to hot dogs! So get a package of noodles, go through your fridge, your pantry and you spice rack and upgrade those noodles into your own masterpiece!

We appreciate you taking time to explore our blog. Be sure to follow us and while you’re at it like us on Facebook and follow us on Twitter! Thanks!

Dark Chocolate Almond Amaretto Cheesecake

cheesecake 2

This didn’t make it through the Labor Day weekend!

Labor Day weekend I decided to bake a cheesecake. I love dark chocolate and amaretto so I thought it best to combine them into one dessert. Just like any cheesecake, there is a bit of work involved. This recipe didn’t call for a bain-marie, or water bath, like some recipes. You could probably use any cheesecake recipe base and add some of the ingredients to achieve the same flavor profile.

If you have read previous posts, you know I take a recipe and make it my own. That’s exactly what I did with this one as well. I used some amaretto liqueur but you could substitute amaretto extract if you like. This cheesecake had a very smooth and creamy texture and wasn’t overpowered by the cream cheese. The almonds and amaretto balanced out perfectly with the dark chocolate so no one flavor overpowered the others.

This will be one of my go~to recipes for all my future cheesecakes that I bake. Our taste-testers all agreed, it was one of the best cheesecakes they’ve had (even those who aren’t big fans of cheesecake!). After you try it, I hope you agree!

Dark Chocolate Almond Amaretto Cheesecake

Ingredients

Crust

1 3/4 C graham cracker crumbs

Drizzle whatever design you want on your cheesecake.

Drizzle whatever design you want on your cheesecake.

1/2 C almonds, chopped fine

1/4 C brown sugar, packed

1/2 C butter

Filling

4 packages cream cheese, room temperature (8-ounce packages)

1 1/2 C sugar

2 T cornstarch

6 large eggs, room temperature

3 containers sour cream (8-ounces each), room temperature

1/3 C amaretto liqueur

1 t vanilla extract

Topping

5 T butter

1 C sliced almonds

4 T sugar

Chocolate Drizzle

1 bag dark chocolate chips

2 T vegetable oil

Sauce

1 C heavy cream

5 T amaretto liqueur

2 1/2 t cornstarch

3 T sugar

Instructions

  1. For the crust, combine the graham crackers, almonds (chopped fine), brown sugar. Add the butter (melted). Place in 10″ spring form pan and press into bottom and about 1″ on the sides. Place in fridge until needed.
  2. Preheat over to 300° F.
  3. For the filling, beat the cream cheese on medium speed until smooth and gradually add the sugar and cornstarch. Make sure it is combined well.
  4. Add one egg at a time, making sure each egg has been incorporated into the batter before adding the next one.
  5. Next add the sour cream, amaretto and vanilla and mix on low until mixed completely.
  6. Pour the filling into the prepared spring form pan. Take the spring form pan and place it on baking sheet and bake for an hour and 30 minutes. Afterward turn the over off but leave the cheesecake in the over for another 1 1/2 – 2 hours. The cheesecake needs to be firm, but still have some wiggle to it. Take a butter knife and loosen the outer edge of the cheesecake from the spring form pan. Let cool to room temperature. Remove the spring form pan. Place the cheesecake on a serving dish or cake platter.
  7. For the topping, melt the butter in a skillet. Add the almonds and the sugar. Stir frequently to prevent the almonds from scorching. When they are light brown remove from heat and let partially cool, then sprinkle across the top of the cheesecake.
  8. Refrigerate the cheesecake at least 8 hours, overnight is best.
  9. For the chocolate drizzle, temper the chocolate with the vegetable oil. Microwave the dark chocolate chips and the oil together in 30 second intervals, stirring between each round to ensure the chocolate is evenly heated/melted. Once melted drizzle the chocolate over the cheesecake as you see fit.
  10. For the sauce, heat the heavy whipping cream in a sauce pan until simmering. In a small bowl whisk together the amaretto and the cornstarch. Once combined, add the mixture to the heavy whipping cream. Mix in the sugar and let simmer until thickened.
  11. Let cool to room temperature.
  12. Cut a piece of cheesecake and pour some of the sauce on it before serving (the sauce makes a great addition to a cup of coffee as well).

Feel free to use this recipe as is, add or modify it to suit your needs. Make it your recipe! We would also appreciate it if you would take the time to follow our blog, and also follow us on Facebook and Twitter (just click each word to be directed to our site!) and many thanks in advance!

Dark Chocolate Chunk Hazelnut Ghost Pepper Brownies

These didn't last long at all!

These didn’t last long at all!

As promised, here is the recipe for these brownies. I love spicy food. Sriracha is always on my counter next to the stove and I’m always looking for ways to incorporate different spicy/heat spices into food, even desserts. There are several brands of chocolate bars I have found over the years with chili’s of various types in them that I have enjoyed, so the combination of sweet and spicy is one I am familiar with.

ghost pepper

Bhut jolokia, aka the ghost pepper

My parents had a pretty successful garden this year and one of the pepper varieties they grew were ghost peppers. These peppers held the Guinness Book of World Records record for hottest pepper from 2007 until 2011 (with the hottest pepper now being the Carolina Reaper taking the crown in 2013). You can read about the 10 hottest peppers here. The ghost pepper is currently ranked at number 7.

My dad gave me a couple of these peppers and I began thinking about how to best use them. I’ve had ghost pepper in various sauces and other dishes, but not in a dessert. I decided to take my love of chocolate and spicy food and combine them into one. The result was the dark chocolate chunk hazelnut ghost pepper brownie.

Here’s a small hint: use gloves when touching/cutting ghost peppers. I used a pair of thick dish washing gloves when I minced the ghost pepper. Then, I washed the knife and cutting board I was using before removing the gloves and discarding them. There was no way I wanted to risk getting any of the ghost pepper oil on my hands, on my face or in my eyes. For those who eschew using gloves for any reason in the kitchen, don’t say you weren’t warned!

Dark Chocolate Chunk Hazelnut Ghost Pepper Brownies

Ingredients

10~12 ounce back dark chocolate chunks (use your favorite brand)

1/2 C unsalted butter

4 large eggs

1/2 t salt

2 C sugar

1 t vanilla

1 1/4 C all~purpose flour

1/4 C unsweetened cocoa powder

1 ghost pepper, minced

1/2 ~ 3/4 C hazelnuts

Directions

  1. Preheat over to 350° and grease a 9″X13″ baking pan.
  2. Melt the butter and 2/3 C of the dark chocolate chunks. I microwave them together in 30 second intervals, stirring between each one until melted/combined.
  3. In a large bowl, whisk together the eggs and salt until frothy.
  4. Add the sugar and vanilla until well blended.
  5. Add the chocolate butter mixture and combine.
  6. Stir the flour and cocoa together, then add to the mixture and blend well.
  7. Fold in the minced ghost pepper and the rest of the bag of dark chocolate chunks.
  8. Pour into the baking dish and top with 1/2~2/3 C of hazelnuts. Use as many as you would like to cover the brownies.
  9. Bake for 35 minutes, or until a toothpick or butter knife comes out clean from the center of the brownie pan.
  10. Cool and serve with a cold glass of milk!

These were eaten by 8 year~old’s to very wise and mature parents! They have a slight heat that builds slowly with each bite, but never overpowered anyone. I might experiment with the recipe and add two ghost peppers, but that will be down the road. One was enough for this batch.

As with any recipe you find on my blog, feel free to add, delete or tweak it in any way, just make it better! We hope you enjoy the recipes. Feel free to submit any questions or comments you may have.

And while your at it, be sure to follow us on the blog, Twitter or Facebook. Thank you!

Coming next, “Dark Chocolate Almond Amaretto Cheesecake!”

We do more than bake!

I am always finding recipes and then seeing how I can make them my own. Whether it is a dessert, main dish or a side. Such is the case with this recipe: Mexican corn salad. This is a much simpler dish compared to the “Hard Apple Cider Butterscotch Layer Cake” taking roughly 20 minutes (if you have your ingredients out and ready to go!)

Add a sprig of fresh cilantro and a few crumbles of cheese before serving!

Add a sprig of fresh cilantro and a few crumbles of cheese before serving!

Anyone can make this simple dish and make it their own. That is the beauty of it. It’s one of those recipes that you can get the whole family involved with and use it as a teaching opportunity with your child(ren). Add what you like, omit what you don’t like, season it how you want. Try different peppers. Don’t like cilantro (c’mon, everyone loves cilantro) then use parsley if you want. Make it yours! I actually made this for a Taste of Home contest. Enjoy!

Ingredients

  • 6 cups corn
  • 1 large diced tomato
  • 1 medium red onion, diced
  • 1 Poblano pepper, diced
  • 1/3 cup mayo
  • 1 bunch finely chopped cilantro
  • 2 teaspoons Mexican chili powder
  • 1 teaspoon cayenne pepper (optional)
  • Cojita cheese
  • Salt and pepper (to taste)

Directions

  • 1. Mix corn, tomato, onion and Poblano pepper in bowl.
  • 2. Stir in mayo, cilantro and spices.
  • 3. Season with salt and pepper to taste.
  • 4. Before serving, sprinkle with generous amount of crumbled Cojita cheese.

Again, make this your own. Next time I make it I am going to grill the corn and cut if off the cob. I may also grill my tomatoes, onion and poblano pepper too. I’m sure it will add an additional flavor component to the dish.

In the next post I’ll share our “Dark Chocolate Chunk Hazelnut Ghost Pepper Brownies” complete with the recipe and a picture.

You can find out more about CakeRageous by clicking the hyperlinks for FB and Twitter. While you’re there, be sure to “like” and “follow” us! Thanks

Hard Apple Cider Butterscotch Layer Cake

There is a recipe for an “Applicious Cake with Butterscotch Frosting” (and a nice two page picture of this cake) in the BH&G Fall Baking 2015 magazine.

The "Applicious Cake with Butterscotch Frosting" recipe is on page 48, 49.

The “Applicious Cake with Butterscotch Frosting” recipe is on page 48, 49.

And as is the case with most recipes I find, I tweak, adjust or modify it to suit my needs. I spent nearly 6 hours this past Sunday baking this beauty. I call my version the “Hard Apple Cider Butterscotch Layer Cake” (and if you leave out the alcohol you can call it the “Apple Cider Butterscotch Layer Cake” or whatever else you want to call it)! I used Jim Beam Apple flavored bourbon whiskey for my cake. If you decide not to use the liqueur, use apple cider in it’s place.

After posting pictures of the cake in a group called “Appalachian Foods and Recipes” on Facebook I was bombarded with requests for the recipe. To make it easier, I decided to post the pictures here with the recipe from the magazine but as I baked the cake, complete with my adjustments. Feel free to get a copy of the magazine and make it according to their recipe. Better yet, take either one and make it your own! Some have suggested using caramel instead of butterscotch. Go for it! Try different varieties of baking apples. I used Granny Smith this time. Next time I will try something else.

Feel free to leave a comment, ask a question, share what changes you made to your cake. And while you are it, like CakeRageous on FB and Twitter.

All six layers of cake, glaze and icing!

All six layers of cake, glaze and icing!

Hard Apple Cider Layer Cake

1 recipe Butterscotch Sauce

3 T butter

5 C peeled, cored, and shredded apples

3/4 C apple cider

4 T Apple liqueur (I used Jim Beam’s Apple Bourbon Whiskey)

3 C all-purpose flour

3 C sugar

1 T baking powder

4 t apple pie spice

1 t baking soda

1/2 t salt

5 eggs, lightly beaten

2/3 C butter, melted

1 recipe Apple Cider Glaze

1 recipe Butterscotch Frosting

Directions

  1. Make the Butterscotch Sauce; chill. In a large nonstick skillet melt the 3 T butter. Add the apples, apple cider and the apple liqueur. Cook over medium-high heat for about 8 minutes or until the liquid is reduced by half. Stir occasionally to prevent the apples from scorching.
  2. Preheat the oven to 350°F. Lightly grease the bottoms of three 8-inch round cake pans. Line the bottoms with waxed paper; grease and lightly flour the pans.
  3. In a large bowl stir together the next six ingredients (through the salt). In another bowl stir together the eggs, the 2/3 C melted butter, and the apple mixture. Stir the egg mixture into the flour mixture and spread evenly between the three cake pans.
  4. Bake about 35 minutes or until a toothpick comes out clean. Cool in the pans for about 10 minutes. Remove from the pans; peel off the waxed paper and cool on wire racks.
  5. Prepare the Apple Cider Glaze. To assemble the cake, use a serrated knife and cut each cake in half horizontally. Evenly brush the Apple Cider Glaze over each layer. Let stand for about 10 minutes. Prepare the Butterscotch Frosting. Place one cake layer, glazed side up, on a serving plate. Spread about 1/2 C Butterscotch Frosting. Repeat with each cake layer. Frost the top and the sides and chill. Before serving, heat the remaining Butterscotch Sauce in the microwave and drizzle on the edges or make whatever pattern you desire on the top!

Butterscotch Sauce

Drizzle the Butterscotch Sauce however you want

Drizzle the Butterscotch Sauce however you want

In a saucepan heat 1/4 C butter over low heat until melted, stirring frequently. Increase the heat to medium. Stir in 6 T light-corn syrup, 1/3 C sugar and 1/3 C dark brown sugar, 1 T water and 1/8 t salt. Bring to boiling, stirring constantly; reduce heat. Simmer, uncovered for about 5 minutes, stirring frequently. Meanwhile, in a small bowl whisk together 6 T heavy whipping cream, 2 t cornstarch and 1 t vanilla extract. Carefully stir into the butter mixture. Return to boiling and cook until thickened and bubbly. Remove from heat and cool. Cover completely and chill before using.

Apple Cider Glaze

In a small saucepan melt 3 T butter. Stir in 1/3 C packed dark brown sugar, 1/4 C apple cider; 4 T apple liqueur, and 2 T heavy whipping cream. Bring to boil, then reduce heat. Simmer, uncovered, 3 minutes. Remove from heat and let cool.

Butterscotch Frosting

In a large mixing bowl or with an electric mixer, beat 16 ounces (two packages) cream cheese and two sticks unsalted butter (at room temperature). Add 1 t vanilla extract and mix on medium for about 1 minute. Add about 10 C of powdered sugar and 1/2 C of the Butterscotch Sauce. Beat until well combined. If the frosting is too thick, add 1 T of heavy whipping cream at a time to the desired consistency. If it is too thin, add powdered sugar, a little at a time, to the desired consistency.

The "Hard Apple Cider Butterscotch Layer Cake"

The “Hard Apple Cider Butterscotch Layer Cake”

There’s always something to learn

Over the last few months I’ve been slowly building a culinary library. There are many great finds at local thrift shops and yard sales, as well as discount bookstores.

Being primarily interested in baking, most of my library deals with that subject. However, cookbooks on international cuisine, yearly annuals/collections, and food history have been added to the collection.

A few of the titles I'm reading

A few of the titles currently being read.

Of the books pictured, my top three would include “Robicelli’s: A Love Story With Cupcakes” (I had the privilege of meeting Matt and Allison at their bakery in Brooklyn NYC, tasting their desserts and having my copy autographed!), “The Dessert Bible,” and “On Food and Cooking: The Science and Lore of the Kitchen.”

In addition to the books being added to the shelves, the local library has been an excellent resource to read a wide range of books dealing with gastronomy, chef biographies and regional cuisine.

It’s interesting to see the variations in similar recipes from everything including brownies to corn salad. These variations range from simple to complex ingredient lists, the use of local/regional to gourmet/rare herbs and spices, or deconstructing a long time favorite dish.

There’s always something to learn!

To Bake or To Punch?

Wow! Has it really been that long since I have posted anything? Guess so. I started with good intentions to post about once a week and obviously that did not happen. Here is my attempt to correct that.

The past several months have been full of ups and downs. To be honest, it has been hard, challenging, depressing, confusing, and stressful. So, how does an aspiring baker/bakery owner handle it: he bakes! The alternative could lead to legal problems!!

bake punch

CakeRageous has moved to the Nicholasville KY area and does not currently have a “home” base yet, but that doesn’t mean there isn’t any baking taking place. There have been cupcakes here and there, apple turnovers, and even some ghost pepper brownies. I have even branched out and started cooking using a wide range of herbs/spices and international flavors.

Plus, I have spent more time than normal doing research on many topics ranging from eggs to salt to coffee to chocolate (that sounds like the ingredients to a recipe). I have also hit many thrift shops and free sites and started acquiring a nice assortment of cookbooks covering everything from how chicken is cooked around the world, spices that heal, Dutch cooking, Hungarian cooking, Caribbean cooking, and the heart and soul of being a chef. This has led to some slight changes with our menu and the addition of some new items in the near future.

I have also changed schools. Beginning the last week in September I will start culinary classes at Sullivan University in Lexington KY. They have an excellent culinary arts program with great reviews and endorsements.

To add to all of that, I am currently employed at Solomon’s Porch. It is a cafe/catering business in Wilmore KY. This has provided me an opportunity to work in a bakery/kitchen/restaurant and I have already learned more than I ever thought possible. There is something new to learn everyday. This will no doubt be a huge help down the road!

Moving forward, the tentative plan is to post at least once a week. It might be a recipe I tried out or a meal I ate. There will be posts about various cookbooks I am reading as well. When school starts I will post what I am learning and other random culinary things.

And, if you there is something you would like me to write about, just send me a message and I will be more than glad to try and work that in too (a recipe you want me to try, a cooking/baking question, or anything else you have wondered about but never have found an answer too). This blog will only become better with your input as well! Please feel free to follow and share this post (and blog). Thank you for taking the time to read these ramblings.

To bake or to punch? I suppose the only thing I should punch is a ball of yeast dough!